The time has finally come… here is the final cut of Hear No Evil!! I’m so happy with the outcome, and all of the hard work, time, and effort put into this has paid off. I hope you enjoy it!
Categories
The time has finally come… here is the final cut of Hear No Evil!! I’m so happy with the outcome, and all of the hard work, time, and effort put into this has paid off. I hope you enjoy it!
Below is my creative critical reflection video (CCR) where I discuss all of the details of creating our film as well as our decision making throughout.
Below are the questions I will be answering in my CCR video. I will use my plan in my actual video to explain and reflect on our work.
1. How do your products use or challenge conventions and how do they represent social groups or issues?
a) Analyze your title sequence and explain your decisions regarding mise-en-scene, cinematography, editing, sound, titles, etc. Show how they use or challenge genre conventions.
b) How are social groups or issues usually represented in your genre? Did you use or challenge these representations?
2. How do your products engage with the audience and how would they be distributed as real media products?
a) Clarify your process of researching and choosing a production company.
b) Discuss how your film would be exhibited and marketed to audiences.
c) What is your target audience? Why? Why would they watch your film?
3) How did your production skills develop throughout this project?
a) How did you become a better filmmaker than you were at the beginning of the class?
b) What did you learn about the process of making films (beginning, middle, end)?
c) Talk about planning, drafting, directing, shooting, revising, editing, sound, etc. as applicable.
4) How did you integrate technologies – software, hardware, and online – in this project?
a) What equipment did you use in the project?
b) What did you learn about using technology?
Let’s just say that editing this movie has really been quite the job. Don’t get me wrong, I loved being editor and I knew what I was signing up for, but it definitely was a bigger job than I had originally thought going into this. Growing up I used to make silly iMovies with my cousins and friends because it was fun to do and I liked putting them together and making them my own. I even recorded a video on a beach vacation with my family and it actually turned out really good being that my 11 year old self put it together. With that being said, I took this job because I had already had personal and academic related experience with iMovie so I knew I would be comfortable doing it. Not to mention, all of the footage was recorded on my phone so I had the clips already, and I can access iMovie on my Mac which was another plus. Having my iCloud connected to all of my devices came in handy since the videos were already synced and ready to use.
Although I spent countless hours at a time editing the film, and sometimes contemplated whether I should just give up, I am able to look back now and realize that the hard work and dedication I put into this doesn’t go unnoticed. I really did put forth all of my effort to make the film as good as I could possibly make it. Taking a look at the rough cut and the final cut back to back shows just how significant the editing process is. Hannah came up with a vision for the film back in January and we were able to work together as partners (and best friends of course) to make the idea come to life. We are both so proud of the outcome, and without our individual contributions and creativity, we couldn’t have made it happen.
Checking in: I finished adding sound to the film and let me just say, it was QUITE the task. It actually wasn’t as hard as I was initially thinking, however it was a very tedious and time consuming step in the postproduction process. After watching the film with all of the sound inserted, I am so proud of it! I worked so hard to get it to be as close to our vision for it as possible and I think it turned out even better than I imagined! The hard work is starting to finally pay off…
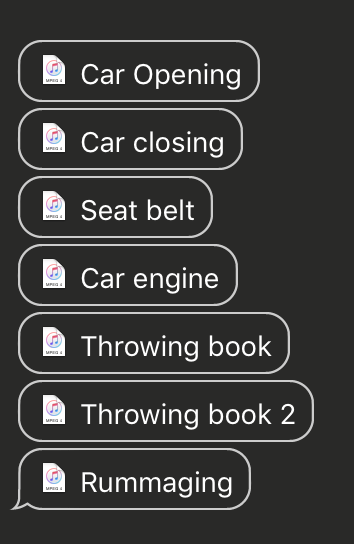
Diving into the process: So, while I was playing around with editing, Hannah took the list of sounds I created and recorded all of them and sent them back to me as voice memos. This was actually really easy to work with because I could drag the voice memo files from messages directly into iMovie right where I wanted them. After that I trimmed them to exactly how long I needed them, and when you watch it back you can’t even tell that they weren’t part of the original audio! I was excited that they worked. Here’s a screenshot of what the sound effects looked like when Hannah sent them over:
I actually ended up keeping the original audio of a couple shots because they had the exact sounds we needed and didn’t have any extra noises. This saved us the extra work of trying to record the sounds we needed when really they’re already there in the original audio. However most of the other clips were still muted because there wasn’t any required sounds for those scenes.
After adding the sound effects, the movie came to life. The sounds made it look more realistic and more like an actual film. However it still needed some background music. At first I didn’t know quite how to get a sound that would go over the whole thing. I knew I wanted a horror ambiance sound that would increase the tension / fear of the film, but I didn’t want anything too over the top or to take away from the actual film itself. I needed a sort of mellow tune but still creepy enough. I searched around on Google and found a sound on YouTube that I really liked. It was free to use and download, so I downloaded the song onto my MacBook and it saved under iTunes. So then in iMovie I was easily able to access it under the “audio” tab and drag it to cover my whole film. I was super surprised that it actually lined up with my film seamlessly. When the demon appears in the apartment at the very end before the title appears, the music actually intensifies and gets louder! So it worked great. It also had some creepy chain noises that play while the title shows up so I think it really made the film ten times better. Here’s the link to the sound I used:
To finally conclude the sound stage, I decided that I wanted a noise to appear every time the hooded figure / demon popped up. This wasn’t something we originally planned, but I ended up loving it once I added it in. I looked up creepy horror sound effects on Google and found a website with a bunch of free downloadable ones. I looked through and found a higher pitched noise, it was quick and unsettling which fit perfectly with what I was needing it for. I again downloaded it like the other sound and inserted it where I needed it in iMovie. Here’s the link to the sound I used: http://soundbible.com/1814-Scary.html.
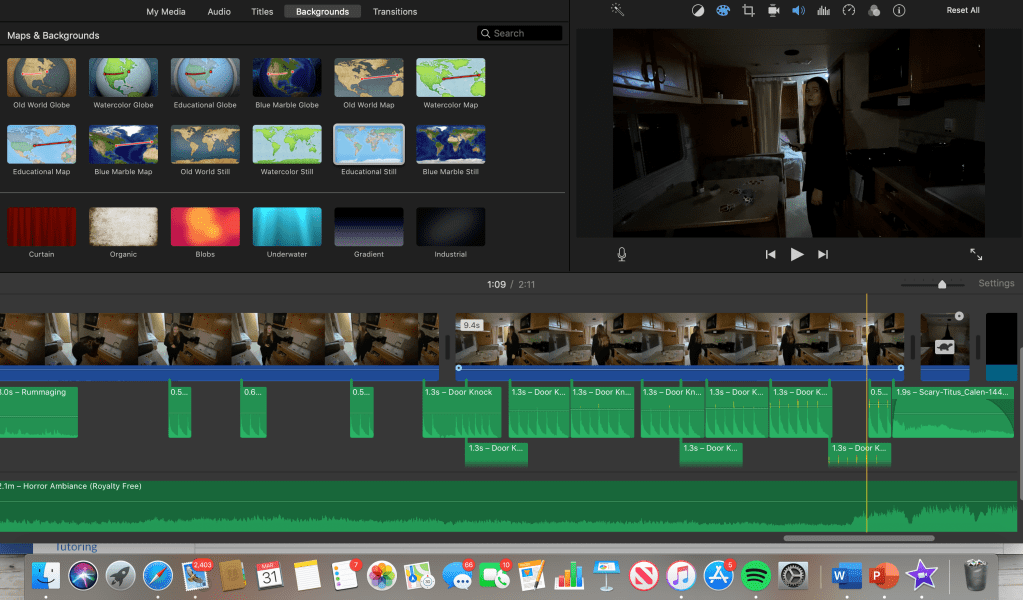
After adding all the sound, I watched the film over and over and I was so happy with how it turned out! I definitely learned how to use iMovie more in depth than I ever have before while creating this film. Take a look at how crazy it looks after adding everything in:
I’d like to say that Hear No Evil is FINALLY finished! Just a few more things to wrap up before I get to show you the final cut, so stay tuned!!
So, now it’s time to add some sound. As of right now, all of the clips are muted because of the unwanted background noise and there isn’t any dialogue to be heard in the original clips. However, sound is essential in order to build up the suspense and tension we want to create within our film. So my job now is to add all of the sound effects and amplified music to fulfill this aspect. So far in the process of editing I have felt everything has been pretty simple and easy to do, but may just be time consuming which I knew from the start. Since we have this super long spring break due to the Coronavirus outbreak, it has been way less stressful to work on editing the film when I can work at my own pace. However, sound is the only aspect of editing that I feel will take me a lot longer to do, and may even be the most difficult for me. I know what I’m wanting to achieve, so I will just have to work as hard as I can to achieve that. After the sound is added, our movie will be nearly complete! Hannah recorded some knocking noises to use at the end of the opening sequence, so I plan on adding that as well as essential sounds like footsteps, closing car doors, car engine, gasping noises, and any other sounds that make sense to be in the film. Since my partner Hannah is in charge of recording sound, I made a list of all the sounds we need so she can record them with her Apple earphones. Having this list will ensure that our movie can be as realistic as possible. I watched the edited rough cut several times and came up with this list of needed sounds:
Before adding the credits: In addition to the title, I need to include the opening credits in our opening sequence. Hannah and I decided that the credits will start to appear right as the film starts, and the title won’t appear till after the opening sequence. I decided that keeping the font of the credits white would work best to keep it looking minimal and keep to the theme.
A list of credits I need to include are:
After adding the credits: Adding the credits was a pretty easy task. I chose iMovie’s “Standard Lower Third” title for most of the credits, and I alternated whether they appeared in the lower left or right of the screen. I used the font “Avenir Heavy” which is a nice bold font but not too crazy or distracting. I kept the titles at size 58 font and a 4.5 second duration each so they are easy to read but don’t distract from the film itself. I’m happy with how they turned out, and if I end up needing to add a couple more in then I always can.
Here’s a quick screen-recording of me creating a credit title:
One of my jobs as the editor is to create a title sequence for our film. Titles of films typically start either right at the beginning of the movie or right after the opening sequence. Hannah and I decided to have ours appear after our opening sequence, which means it will appear last after the first two minutes. We decided to do this to let the audience absorb what they were seeing so that they could infer the setting, what is going on, the character, the problem, etc. Letting the tension build up before the title will give it more significance, and the audience will know the basic key components of the film after the opening scenes which they will then associate with the title.
Titles within the horror genre tend to be pretty universally similar. Lots of them have big bold letters in scary fonts to correlate with the horror theme. Hannah and I knew what we wanted from the start, so creating the title was a pretty easy task. We referred to a few different horror movie titles that had big red lettering in creepy fonts:

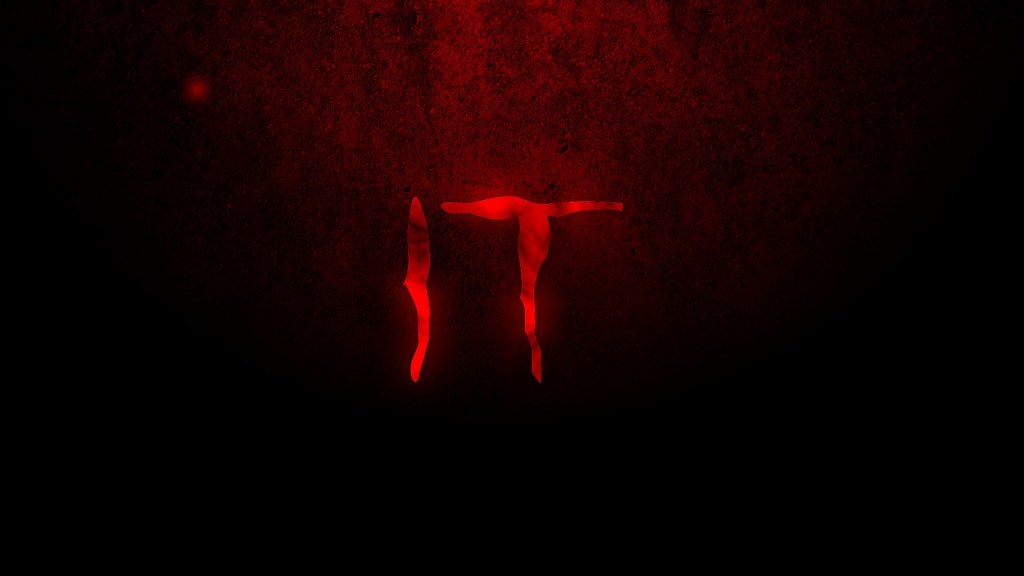
To get our font, I searched up on google “Horror Movie Fonts” and I went to the website https://www.dafont.com/ and chose the one we both liked the best:

We chose the font above, titled “stranger creature”. I simply downloaded the font, and copied and pasted each letter of our title into iMovie. I changed the color of the font to a deep / bold red color, since red resembles blood and all things scary. I increased the font to a large size to make a strong statement. Below is a sped-up screen recording of me creating the title.
Color correcting is an important step in the post-production stage. It is a process where the editor has the ability to fix color issues and can make the footage look the same throughout the film. For instance one clip may be more saturated or have a cooler tone than another, therefore the editor can balance out the aspects of each clip to make them match better. This aids in the continuity of the film as well. Having all of the clips match with the same color / light appearances is what increases the quality of a movie.
In iMovie, you are able to adjust the shadows, highlights, saturation, brightness, contrast, and warmth of each clip. Since our film is in the horror genre, we wanted to keep the saturation and brightness down as well as increase the shadows. Having the lack of bright colors and intense lighting creates a spookier appearance, which is what we want to strive for in our film. Below is a quick sped-up version of me doing some color correction.
Cutting: After I put together all of the clips and placed them in order for the rough cut, I began to trim them so that they aligned and flowed together. I used iMovie to easily trim each clip and make it to where they followed a continuity editing format. Our goal is to make each clip flow well with the others so that the storyline is understandable and can be followed. A problem I ran into is that two of the clips kind of seem jumpy as if they’re missing a shot in between. The clip where Evelyn starts her car and sees the demon in her backup camera quickly cuts to another clip of her looking back at the camera and noticing that it’s gone. This is an example of a jump cut, and it kind of feels out of place. Hannah and I may decide to film something to go in between these two shots to ensure that it all comes together smoothly. Other than that one hiccup, cutting the clips has been a successful task.
Transitions: Most of our clips work best without any transitions because each clip occurs right after the other, so having a transition would make it seem like time has passed between each shot and we don’t want that. The only area I added a couple transitions to is at the very beginning of the film. The movie starts off with a black screen and fades out to the establishing shot of the abandoned building. I felt that starting with a black screen looked more professional and didn’t make the movie seem like it had an abrupt beginning. I also added iMovie’s “cross dissolve” transition between the establishing shot and the scene at the cult to kind of make it look less choppy. The cross dissolve transition is pretty much just a fade in / fade out, and I felt that it made the beginning have a sort of slower pace, which eventually speeds up as the tension builds. This is typical for horror movies to have a somewhat ‘normal’ pace at the beginning, which eventually increases once the thrill is introduced. It all adds to the suspense and fear that horror films like ours want to entail from our audiences.
